Cookie Cutters With Imprint : How to Use - Tips & Tricks
- Feb 7, 2022
- 2 min read
Updated: Oct 24, 2025
Here are some tips for using imprint cookie cutters to achieve the perfect result! 🙌
Please watch the video in the end 💗
Here are some easy tips to help you get the best results when using cookie cutters with an imprint - so your cookies keep their shape after baking and look amazing! 😍
You’ll also find a video below showing all the steps in action, along with a few delicious cookie recipes to try - be sure to check it out! 🙌🍪
TIP 1. Use chilled dough - it makes the cutter easier to handle and helps prevent cookies from spreading too much while baking.
TIP 2. Roll out the dough to about 3/16"–1/4" thick - this is the ideal thickness for imprint cookie cutters to work perfectly and keep details clean.
TIP 3. Lightly dust the rolled-out dough and the cutter with flour as needed (as shown in the video).

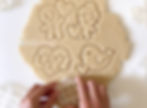
TIP 4. When cutting out, press more firmly on the outer edge of the cutter and less on the middle imprint area. This keeps the imprint shallow and clean, and helps the dough release more easily.
TIP 5. If you’re using thicker dough and it doesn’t release easily, gently use a spatula or knife to help lift or “knock it out”, as shown in the video below.

TIP 6. For better shape retention, chill the cutouts in the fridge for 10–15 minutes before baking. This helps the cookies hold their shape beautifully while baking. 🙌
Once baked, you can enjoy them as they are or have fun decorating with icing! 🍪✨

And here is the VIDEO showing all the steps in action 💗👇

TIP 7. If your cookies puffed up after baking, gently flatten them with a spatula through baking paper, just like in the video below! 😊👇
HERE YOU CAN FIND SOME GREAT COOKIES RECIPES:
HAPPY BAKING 🫶 🎉

Follow my INSTAGRAM - @makecookies.shop
